

Intro
In this post I’m going to try something a little different, I’m going to explain the process I used to control a four gang power socket with PowerShell. Now I’m only going to be sending serial commands with PowerShell as the hard work is being done by an Arduino and the “rc-switch” library but still this was a really fun project to do and one I wanted to share!
To start, you’ll need all the following items:
Bill of materials:
| # | Name | Price | Shop |
| 1 | Arduino Uno | £15 | Google/eBay |
| 2 | 433 Mhz Transmitter and Receiver | £3 | eBay: search for “Arduino 433” or “RF Link kit” |
| 3 | Energenie Trailing Gang with Four Radio Controlled Surge Protected Sockets | £20 | https://energenie4u.co.ukwww.amazon.co.uk |
| 4 | Breadboard and a few jumper cables | – | Google/eBay |
Part 1 – Capture the RF codes for your Energenie Power Strip
To start you will need to connect up your circuit like the diagram below

This is a photo of how mine looked when completed

Like I mentioned in the intro we will be using the “rc-switch” library which can be downloaded from http://code.google.com/p/rc-switch/. Add this to your \arduino-1.0.1-windows\arduino-1.0.1\libraries\ directory and open the Arduino IDE.
Now open the “ReceiveDemo_Simple” sketch and upload this to your Arduino.

Open the serial monitor, assuming everything is wired up correctly when you press the buttons on your remote the codes will appear as “Received <7Digit> / 24bit Protocol: 1”, for example:
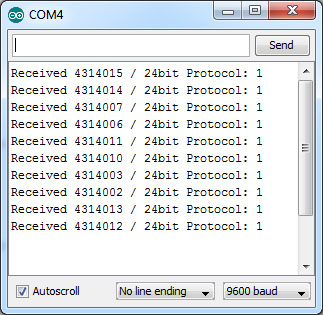
Collect each of the buttons 7 digit codes into a table so we can use them in the transmission circuit. I recommend using a table, for example:
| Switch | ON | OFF |
|
1 |
4314015 |
4314014 |
|
2 |
4314007 |
4314006 |
|
3 |
4314011 |
4314010 |
|
4 |
4314003 |
4314002 |
| ALL |
4314013 |
4314012 |
This concludes part 1, I have included links to the next and previous posts below to ease navigation of this blog series
Thanks for reading,
jfrmilner


Reblogged this on matt2005.
[…] PowerShell Power Sockets (Arduino/RF) – Part 1 – Capture the RF codes for your Energenie Power Str… […]