Part 2 – Configure the Arduino with the RF Transmission Sketch for your Energenie Power Strip
Continuing on from the previous post where we collect all the RF codes for my Energenie Power Strip we will disassemble the receive circuit and build one for RF transmission.
Connect up your circuit like the below diagram

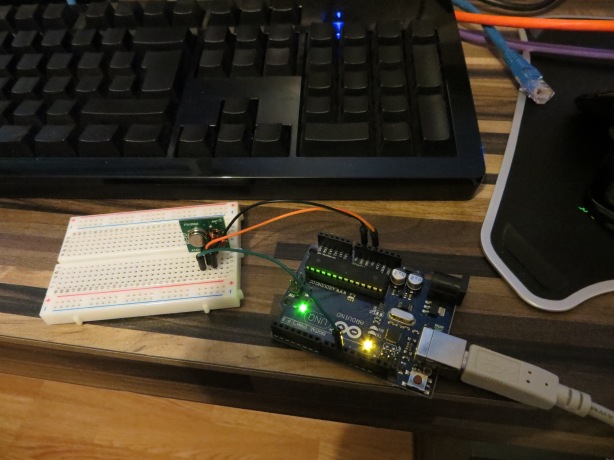
Here is a photo of mine once completed
My sketch below is a modified version of the “Examples > RCSwitch > SendDemo” Sketch included with the library. Basically the Arduino listens on the Serial port for a byte and if one is found it will check for a matching if statement and actions that code block. Each if statement has been configured for one of the ten possible codes captured earlier and also set to send back a confirmation of which code block was ran, the latter is useful for debugging.
Here is my sketch
/*
 Example for different sending methods
 http://code.google.com/p/rc-switch/
 Edit by jfrmilner for Energenie PowerStrip using Serial input
*/

#include <RCSwitch.h>

RCSwitch mySwitch = RCSwitch();
byte inByte = 0;
void setup() {

 Serial.begin(9600);

 // Transmitter is connected to Arduino Pin #10
 mySwitch.enableTransmit(10);

// Optional set pulse length.
 // mySwitch.setPulseLength(320);

 // Optional set protocol (default is 1, will work for most outlets)
 // mySwitch.setProtocol(2);

 // Optional set number of transmission repetitions.
 // mySwitch.setRepeatTransmit(15);

 //Serial.println("Ready"); // Ready to receive commands
}

void loop() {
 /* Switch using decimal code */
 if(Serial.available() > 0) { // A byte is ready to receive
 inByte = Serial.read();
 if(inByte == '1') { // byte is '1'
 mySwitch.send(4314015, 24);
 Serial.println("1 ON");
 }
 else if(inByte == '2') { // byte is '2'
 mySwitch.send(4314014, 24);
 Serial.println("1 OFF");
 }
 else if(inByte == '3') { // byte is '3'
 mySwitch.send(4314007, 24);
 Serial.println("2 ON");
 }
 else if(inByte == '4') { // byte is '4'
 mySwitch.send(4314006, 24);
 Serial.println("2 OFF");
 }
 else if(inByte == '5') { // byte is '5'
 mySwitch.send(4314011, 24);
 Serial.println("3 ON");
 }
 else if(inByte == '6') { // byte is '6'
 mySwitch.send(4314010, 24);
 Serial.println("3 OFF");
 }
 else if(inByte == '7') { // byte is '7'
 mySwitch.send(4314003, 24);
 Serial.println("4 ON");
 }
 else if(inByte == '8') { // byte is '8'
 mySwitch.send(4314002, 24);
 Serial.println("4 OFF");
 }
 else if(inByte == '9') { // byte is '9'
 mySwitch.send(4314013, 24);
 Serial.println("ALL ON");
 }
 else if(inByte == '0') { // byte is '0'
 mySwitch.send(4314012, 24);
 Serial.println("ALL OFF");
 }
 else { // byte isn't known
 Serial.println("Unknown");
 }
 }
}
Once the Sketch has been uploaded to your Arduino you could use the Serial Monitor to send one of the numbers or any serial aware software for that matter but if you read on to part 3 I will demonstrate doing this with an advanced PowerShell function.
This concludes part 2, I have included links to the next and previous posts below to ease navigation of this blog series
Thanks for reading,
jfrmilner


Reblogged this on matt2005.
[…] PowerShell Power Sockets (Arduino/RF) – Part 2 – Configure the Arduino with the RF Transmission Sk… […]