Archive for December, 2012


First Post 1 of 3

Previous Post 2 of 3

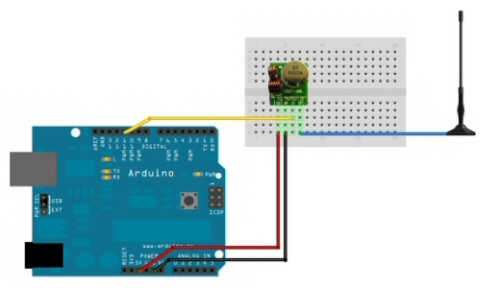
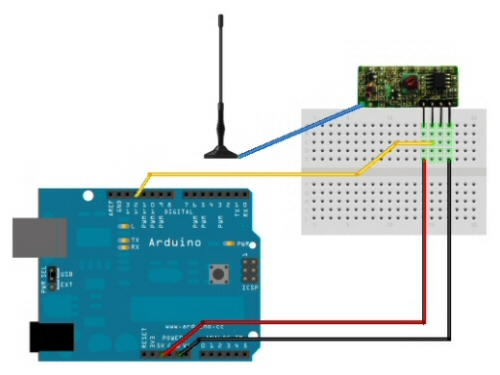
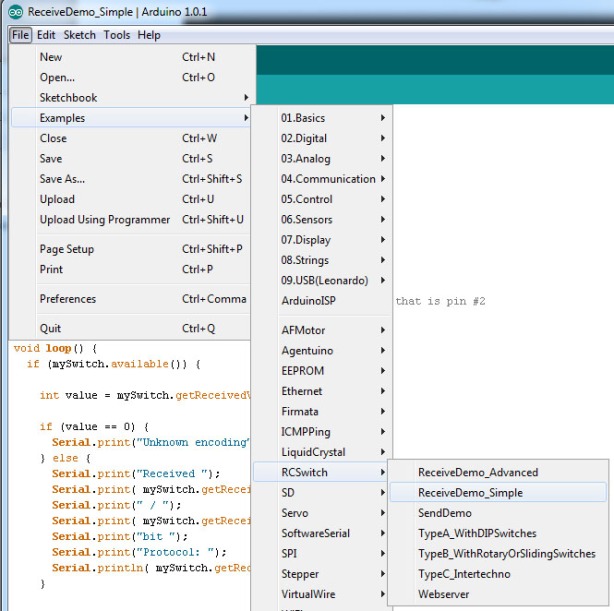
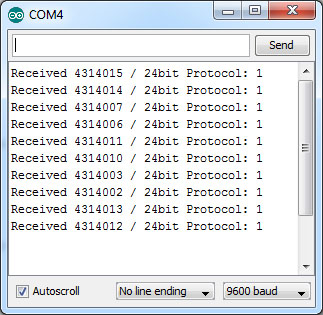
So to summarize we have collected all the RF codes for my Energenie Power Strip, created a Sketch on an Arduino connected to a an RF transmitter the only thing left it to use PowerShell to send Serial commands.

Now for the PowerShell code:

function Send-ArduinoSerial {
param ( [parameter(Mandatory=$true, ValueFromPipeline=$true)] [int[]] $byte )
#Find Arduino COM Port
$PortName = (Get-WmiObject Win32_SerialPort | Where-Object { $_.Name -match "Arduino"}).DeviceID
if ( $PortName -eq $null ) { throw "Arduino Not Found"}
#Create SerialPort and Configure
$port = New-Object System.IO.Ports.SerialPort
$port.PortName = $PortName
$port.BaudRate = "9600"
$port.Parity = "None"
$port.DataBits = 8
$port.StopBits = 1
$port.ReadTimeout = 2000 #Milliseconds
$port.open() #open serial connection
Start-Sleep -Milliseconds 100 #wait 0.1 seconds
$port.Write($byte) #write $byte parameter content to the serial connection
try    {
#Check for response
if (($response = $port.ReadLine()) -gt 0)
{ $response }
}
catch [TimeoutException] {
"Time Out"
}
finally    {
$port.Close() #close serial connection
}
}

Once the function has been loaded into your PowerShell console we can turn on and off each of the sockets, for example

Energenie-PSFunctionExample

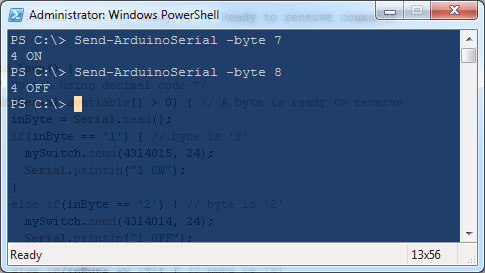
This is one of those moments when an image fails to express the sheer excitement of a lamp going on and off!

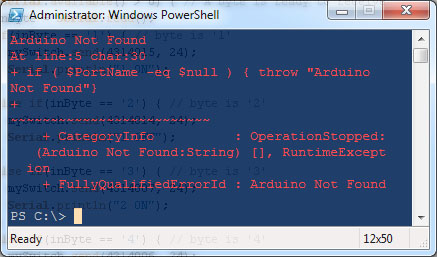
If you forget to plug in your Arduino an exception will be thrown for example

Energenie-PSFunctionExampleError

What’s Next/Further thoughts

  • Program some keyboard shortcuts to power the sockets on and off.
  • Create a web front end and on that note I should point out that Energenie have another solution the LAN Power Management System available, this would be an easier solution for the none techie folks.
  • Try this with a Raspberry Pi

Anyways, thanks for reading my posts and I hope you enjoyed Powering Power Sockets with PowerShell as much as I did!

Regards,

jfrmilner


The WordPress.com stats helper monkeys prepared a 2012 annual report for this blog.

Here’s an excerpt:

4,329 films were submitted to the 2012 Cannes Film Festival. This blog had 25,000 views in 2012. If each view were a film, this blog would power 6 Film Festivals

Click here to see the complete report.


Previous Post 1 of 3

Next Post  3 of 3

Part 2 – Configure the Arduino with the RF Transmission Sketch for your Energenie Power Strip

Continuing on from the previous post where we collect all the RF codes for my Energenie Power Strip we will disassemble the receive circuit and build one for RF transmission.

Connect up your circuit like the below diagram

Energenie-fritzingTx

Here is a photo of mine once completed

Energenie-PhotoTx

My sketch below is a modified version of the “Examples > RCSwitch > SendDemo” Sketch included with the library. Basically the Arduino listens on the Serial port for a byte and if one is found it will check for a matching if statement and actions that code block. Each if statement has been configured for one of the ten possible codes captured earlier and also set to send back a confirmation of which code block was ran, the latter is useful for debugging.

Here is my sketch


/*
 Example for different sending methods
 http://code.google.com/p/rc-switch/
 Edit by jfrmilner for Energenie PowerStrip using Serial input
*/

#include <RCSwitch.h>

RCSwitch mySwitch = RCSwitch();
byte inByte = 0;
void setup() {

 Serial.begin(9600);

 // Transmitter is connected to Arduino Pin #10
 mySwitch.enableTransmit(10);

// Optional set pulse length.
 // mySwitch.setPulseLength(320);

 // Optional set protocol (default is 1, will work for most outlets)
 // mySwitch.setProtocol(2);

 // Optional set number of transmission repetitions.
 // mySwitch.setRepeatTransmit(15);

 //Serial.println("Ready"); // Ready to receive commands
}

void loop() {
 /* Switch using decimal code */
 if(Serial.available() > 0) { // A byte is ready to receive
 inByte = Serial.read();
 if(inByte == '1') { // byte is '1'
 mySwitch.send(4314015, 24);
 Serial.println("1 ON");
 }
 else if(inByte == '2') { // byte is '2'
 mySwitch.send(4314014, 24);
 Serial.println("1 OFF");
 }
 else if(inByte == '3') { // byte is '3'
 mySwitch.send(4314007, 24);
 Serial.println("2 ON");
 }
 else if(inByte == '4') { // byte is '4'
 mySwitch.send(4314006, 24);
 Serial.println("2 OFF");
 }
 else if(inByte == '5') { // byte is '5'
 mySwitch.send(4314011, 24);
 Serial.println("3 ON");
 }
 else if(inByte == '6') { // byte is '6'
 mySwitch.send(4314010, 24);
 Serial.println("3 OFF");
 }
 else if(inByte == '7') { // byte is '7'
 mySwitch.send(4314003, 24);
 Serial.println("4 ON");
 }
 else if(inByte == '8') { // byte is '8'
 mySwitch.send(4314002, 24);
 Serial.println("4 OFF");
 }
 else if(inByte == '9') { // byte is '9'
 mySwitch.send(4314013, 24);
 Serial.println("ALL ON");
 }
 else if(inByte == '0') { // byte is '0'
 mySwitch.send(4314012, 24);
 Serial.println("ALL OFF");
 }
 else { // byte isn't known
 Serial.println("Unknown");
 }
 }
}

Once the Sketch has been uploaded to your Arduino you could use the Serial Monitor to send one of the numbers or any serial aware software for that matter but if you read on to part 3 I will demonstrate doing this with an advanced PowerShell function.

This concludes part 2, I have included links to the next and previous posts below to ease navigation of this blog series

Previous Post 1 of 3

Next Post  3 of 3

Thanks for reading,

jfrmilner


Next Post (Part 2 of 3)

Final Post (Part 3 of 3)

Intro

In this post I’m going to try something a little different, I’m going to explain the process I used to control a four gang power socket with PowerShell. Now I’m only going to be sending serial commands with PowerShell as the hard work is being done by an Arduino and the “rc-switch” library but still this was a really fun project to do and one I wanted to share!

To start, you’ll need all the following items:

Bill of materials:

# Name Price Shop
1 Arduino Uno £15 Google/eBay
2 433 Mhz Transmitter and Receiver £3 eBay: search for “Arduino 433” or “RF Link kit”
3 Energenie Trailing Gang with Four Radio Controlled Surge Protected Sockets £20 https://energenie4u.co.ukwww.amazon.co.uk
4 Breadboard and a few jumper cables Google/eBay

Part 1 – Capture the RF codes for your Energenie Power Strip

To start you will need to connect up your circuit like the diagram below

Energenie-fritzingRx

This is a photo of how mine looked when completed

Energenie-PhotoRx

Like I mentioned in the intro we will be using the “rc-switch” library which can be downloaded from http://code.google.com/p/rc-switch/. Add this to your \arduino-1.0.1-windows\arduino-1.0.1\libraries\ directory and open the Arduino IDE.

Now open the “ReceiveDemo_Simple” sketch and upload this to your Arduino.

Energenie-LoadReciveSketch

Open the serial monitor, assuming everything is wired up correctly when you press the buttons on your remote the codes will appear as “Received <7Digit>  / 24bit Protocol: 1”, for example:

Energenie-COMResults

Collect each of the buttons 7 digit codes into a table so we can use them in the transmission circuit. I recommend using a table, for example:

Switch ON OFF

1

4314015

4314014

2

4314007

4314006

3

4314011

4314010

4

4314003

4314002

ALL

4314013

4314012

This concludes part 1, I have included links to the next and previous posts below to ease navigation of this blog series

Next Post (Part 2 of 3)

Final Post (Part 3 of 3)

Thanks for reading,

jfrmilner


At work this week I was working with one of our Linux engineers and he used the command “cURL ifconfig.me” which promptly provided him with the external IP of the system. I thought to myself, “I wonder if this is possible from PowerShell” and sure enough it is.

Using the Invoke-WebRequest cmdlet we can send http(s) requests to a web service. Note that this is a PowerShell 3.0 only cmdlet.

Let’s give it a try:

Invoke-WebRequest ifconfig.me

Get-ExternalIP-01

Not quite what we’re looking for. On inspection of the website http://ifconfig.me/ we can see that there are many command line options, lets try just the /IP option

Invoke-WebRequest ifconfig.me/ip

Get-ExternalIP-02

Much better and we can clearly see that the IP address is returned in Content which it fine for a quick check at the command line but not so great if your using it for scripting. To collect just the external IP we could wrap the command in parentheses, for example:

(Invoke-WebRequest ifconfig.me/ip).Content

Nice.

I thought that this would make a handy addition to my PowerShell Profile so I created a quick function


function Get-ExternalIP {
(Invoke-WebRequest ifconfig.me/ip).Content
}

Get-ExternalIP-03

Perfect!

An alternative to ifconfig.me is available at http://www.whatismyip.com/ip-faq/automation-rules/, for example

(Invoke-WebRequest http://automation.whatismyip.com/n09230945.asp).Content

Thanks for reading

Regards,

jfrmilner