Archive for the ‘PowerShell’ Category


The right tool joypad for the job

The RetroPie project is great! You can turn your Raspberry Pi into a NES/SNES Mini clone in no time and you don’t need to stop there as adding additional systems such as Atari 2600, Master System, MegaDrive, C64, PlayStation 1 etc happen almost automagically thanks to some clever install scripts. Playing these classic consoles with software emulation provides near perfect picture and sound but using a modern controller such as the Xbox 360 controller was ruining my experience and just felt wrong. I thought to myself could this be improved and decided to pay a visit to my original boxed up game consoles which have been happily yellowing (as it turns out) in my loft and gathered up a bunch of my favourite joysticks and joypads.

I then set about reverse engineering each one. All the controllers used here are originals and unmodified (‘warts and all’ – or should I say long thick cables that act as trip hazards, all part of the charm!) the propriety connectors were obtained by sourcing and cutting up extension cables as these are still being made and are readily available. This also ensures these classic joypads will still be usable on their original systems, keeping my childhood intact! Once one was completed I shared the code on my github, if interested please check them out https://github.com/jfrmilner/Arduino-USBRetroGamingControllers

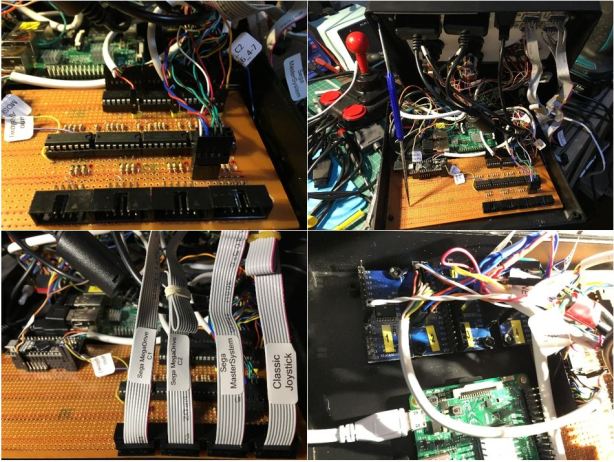
With this experience, I designed a circuit board and selector system so they could all be connected and used on one system. The board acts as a shield for an Arduino Micro that expands the available pins allowing all the controllers to be connected. This works by using a series of Shift-in Registers, Shift-out Registers and some Multiplexers. The Shift-in’s handle the simple switch based controllers like the C64 joystick, the Shift-out’s control the Multiplexers (one nibble per IC) and some LEDs on the selector, and the Multiplexers connect the controllers that require direct access to the Arduino’s digital pins. The latter is required to meet the response times of ICs in the controllers which are usually Shift Register(s) or Multiplexer(s) (yes more of them). The Arduino presents itself as two joypads with native plug-and-play support for Microsoft Windows 7+ and Linux/RetroPie. The selector is simply a ring of LEDs with a potentiometer in the centre, using the knob will move the lit LED to the desired controller pictured in that position, a simple system with an unexpected bonus of being a little retro in its appearance.

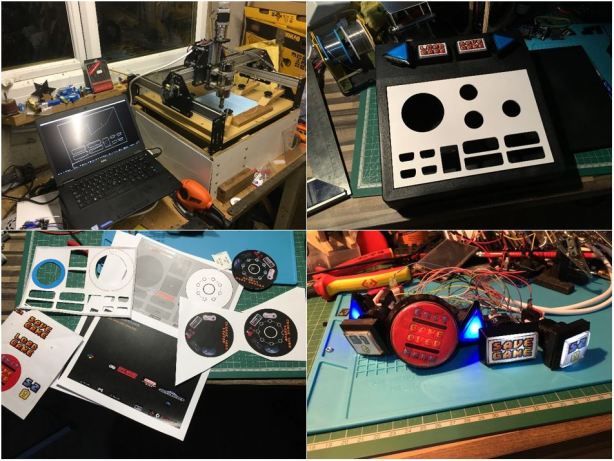
The case was sourced from eBay and was chosen because of the small size and removable front panel, a handy feature providing the flexibility for future revisions. Using the graphics editor software Inkscape I created a design for the front panel and positioning of the multitude of game ports. This was imported into jscut.org and milled out on my trusty Shapeoko 2 CNC. A nice feature of RetroPie is that it has some handy shortcuts for things like Loading, Saving and Exiting games which greatly improve usability for casual users. To make these shortcuts available I added some LED Arcade buttons with custom labels which connect to an SX1509 (this simplifies LED effects and Interrupt offloading) and another Arduino 32u4 based board this time presenting as a keyboard. The overall look feels like a blending of the early Atari consoles and Arcade machine.

In efforts to keep this writeup short I’ve deliberately kept the details at a fairly high level but if anyone would like me to expand on an area then please leave a comment, same goes if you have any suggestions. I’m pleased with how this collection of hacks has turned out and most importantly I’ve had fun learning what makes all these controllers tick. As for the console, this will live in the break out room at work, coffee and a few rounds of Bomberman with the guys, ah bliss!

jfrmilner


A pastebin is a type of web application where users can store plain text. There are many implementations and versions of pastebin found around the web, this Script is designed to with Stikked https://github.com/claudehohl/Stikked (mainly because that’s what we’re using at work). All the Linux systems I administer have the following alias for Curl

alias pastebin='curl -k -d text="`cat -`" -d name="`whoami`@`hostname -f`" https://paste.work.net/api/create 2>/dev/null'

This allows me to quickly pipe the results of a command to pastebin where I can then send the link via Instant Message/Twitter for example. I really like this functionality and wanted to have the same ability when I’m working at my Windows PowerShell prompt. The end result is an Advanced Function that wraps Invoke-WebRequest (similar in concept to cURL). This function allowed me to add additional parameters for options available in the API http://paste.scratchbook.ch/api, with my favourite being “Language” which provides the option to syntax highlight code.

Here is a quick video demo of the function in action

Below is the v1.0 code and here is a link to the code on my GitHub page which will contain the latest version https://github.com/jfrmilner/PowerShell-Out-PasteBin/blob/master/Out-PasteBin.ps1

function Out-PasteBin {
	<#
	.SYNOPSIS
	A PowerShell function to output to a Stikked PasteBin. 
		It fully supports being used in the current pipeline or simply cat'ing a text file. 
		The URL for the Paste is copied to the Clipboard for ease of access.
	Its recommended that this function be added to your PowerShell Profile to guarantee availability
	PowerShell Profiles - http://technet.microsoft.com/en-us/library/bb613488(v=VS.85).aspx 
	.PARAMETER <inputPipeline>
	Inbound object that will be converted to String for uploading to Stikked PasteBin
	.PARAMETER <Language>
	Code Language. Default = "text"
	.PARAMETER <username>
	Username. Default = current Windows logged in Username.
	.PARAMETER <Private>
	None private Pastes will be publicly listed and will appear on recent lists etc. Default = True (Private)
	.PARAMETER <expireMinutes>
	Paste liftime in Minutes. Default = 30.
	.EXAMPLE
	Get-VM | Out-PasteBin
	.EXAMPLE
	Get-ChildItem | Out-PasteBin -expireMinutes 120
	.EXAMPLE
	cat Out-PasteBin.ps1 | Out-PasteBin -language PowerShell
	.NOTES
		Author: jfrmilner/John Milner
		Blog  : https://jfrmilner.wordpress.com 
		File Name: Out-PostBin.ps1
		Requires: Powershell V2
		Legal: This script is provided "AS IS" with no warranties or guarantees, and confers no rights. You may use, modify, reproduce, and distribute this script file in any way provided that you agree to give the original author credit.
		Version: v1.0 - 2015/06/18
	#>
    param(
	   	[parameter(ValueFromPipeline=$true, ValueFromRemainingArguments=$true)]
	    $inputPipeline
		,
		[ValidateSet("html5", "css", "javascript", "php", "python", "ruby", "lua", "bash", "erlang", `
		"go", "c", "cpp", "diff", "latex", "sql", "xml", "text", "0", "4cs", "6502acme", "6502kickass",`
		"6502tasm", "68000devpac", "abap", "actionscript", "actionscript3", "ada", "algol68", "apache",` 
		"applescript", "apt_sources", "asm", "asp", "autoconf", "autohotkey", "autoit", "avisynth", "awk",` 
		"bascomavr", "basic4gl", "bf", "bibtex", "blitzbasic", "bnf", "boo", "c_loadrunner", "c_mac", `
		"caddcl", "cadlisp", "cfdg", "cfm", "chaiscript", "cil", "clojure", "cmake", "cobol", "coffeescript",`
		"csharp", "cuesheet", "d", "dcs", "delphi", "div", "dos", "dot", "e", "ecmascript", "eiffel", "email", `
		"epc", "euphoria", "f1", "falcon", "fo", "fortran", "freebasic", "fsharp", "gambas", "gdb", "genero", `
		"genie", "gettext", "glsl", "gml", "gnuplot", "groovy", "gwbasic", "haskell", "hicest", "hq9plus", `
		"html4strict", "icon", "idl", "ini", "inno", "intercal", "io", "j", "java", "java5", "jquery", "klonec", `
		"klonecpp", "lb", "lisp", "llvm", "locobasic", "logtalk", "lolcode", "lotusformulas", "lotusscript", `
		"lscript", "lsl2", "m68k", "magiksf", "make", "mapbasic", "matlab", "mirc", "mmix", "modula2", "modula3",`
		"mpasm", "mxml", "mysql", "newlisp", "nsis", "oberon2", "objc", "objeck", "ocaml", "oobas", "oracle11", `
		"oracle8", "oxygene", "oz", "pascal", "pcre", "per", "perl", "perl6", "pf", "pic16", "pike", "pixelbender", `
		"pli", "plsql", "postgresql", "povray", "powerbuilder", "powershell", "proftpd", "progress", "prolog", `
		"properties", "providex", "purebasic", "q", "qbasic", "rails", "rebol", "reg", "robots", "rpmspec", `
		"rsplus", "sas", "scala", "scheme", "scilab", "sdlbasic", "smalltalk", "smarty", "systemverilog", "tcl",`
		"teraterm", "thinbasic", "tsql", "typoscript", "unicon", "uscript", "vala", "vb", "vbnet", "verilog", "vhdl",`
		"vim", "visualfoxpro", "visualprolog", "whitespace", "whois", "winbatch", "xbasic", "xorg_conf", "xpp", `
		"yaml", "z80", "zxbasic")]
		[string]$language = "text"
		,
		[string]$username = [Environment]::UserName
		,
		[bool]$private = $true
		,
		[int]$expireMinutes = 30
	    )
	begin {
		Add-Type -AssemblyName System.Web
		Add-Type -AssemblyName System.Windows.Forms
		[array]$text=@()
	}
    process {
		$text += $inputPipeline
	}
	end {
		#Create Paste string from input
		$string = [System.Web.HttpUtility]::UrlEncode($($text | Format-Table -AutoSize | Out-String))
		$Global:PSContent = @() 
		$Global:PSContent += "private=$([int]$private)&"
		$Global:PSContent += "lang=$($language)&"
		$Global:PSContent += "name=$($username)&"
		$Global:PSContent += "expire=$($expireMinutes)&"
		$Global:PSContent += "title=pipeline&"
		$Global:PSContent += "text=$($string)"
		try
		 {
			#Upload to Stikked PasteBin. Change the Uri to your hosted Stikked PasteBin.
			Invoke-WebRequest -Uri 'http://paste.scratchbook.ch/api/create' -Method Post -Body $PSContent -OutVariable response | Out-Null
			
			#Copy Stikked URL response to Clipboard
			Write-Host $('[copied to clipboard] Postbin URL: {0}' -f $response.Content) -ForegroundColor Green -BackgroundColor Blue
			[System.Windows.Forms.Clipboard]::SetText( $response.Content, 'UnicodeText' )
		 }
		catch [system.exception]
		 {
		  	"caught a system exception"
		 }
	}
}

Note for WordPress code copy
If you double click anywhere on the code, the entire code view is replaced with a pre-selected view from which users can copy with a simple Ctrl+C. Clicking anywhere else returns the view to the original state.

To make this function useful it really should be available for all your PowerShell sessions so I recommended that you add it to your PowerShell Profile, see the following link for details – http://technet.microsoft.com/en-us/library/bb613488(v=VS.85).aspx

Regard,

jfrmilner


The WordPress.com stats helper monkeys prepared a 2014 annual report for this blog.

Here’s an excerpt:

The concert hall at the Sydney Opera House holds 2,700 people. This blog was viewed about 47,000 times in 2014. If it were a concert at Sydney Opera House, it would take about 17 sold-out performances for that many people to see it.

Click here to see the complete report.


In this post I detail how I created a simple ScreenSaver prevention AutoHotKey Script which can be toggled on or off with a simple key press.

What is AutoHotkey?
AutoHotkey (AHK) is a free, open-source macro-creation and automation software for Windows that allows users to automate repetitive tasks. It is driven by a scripting language that was initially aimed at providing keyboard shortcuts, otherwise known as hotkeys, that over time evolved into a full-fledged scripting language.

The Problem
Due to an Internal IT policy we have a screen saver GPO set with a 10 minute timer, now ordinarily this is fine but it can be a real pain when delivering PowerPoint presentations so I created a ahkscript to move the mouse one pixel to the right and then back again every minute which tricks the computer into thinking there is an active user. This allows for a light touch workaround to the problem which can be enabled or disabled by pressing Ctrl+5. I’ve even added a Tray Tip so its easy to tell if this is running or not, for example:

ScreenSaverPreventionEnabled

;autoexecute section
preventScreenSaverVar := false ; Boolean for Screen-saver prevention label (subroutine). True = running/enabled.
SetTimer, preventScreenSaver, 60000 ; Screen-saver launch prevention label (subroutine), checks every 1 minute


^5::
global preventScreenSaverVar := !preventScreenSaverVar
if (global preventScreenSaverVar) {
TrayTip, Screen Saver Prevention, Enabled, 2, 17
}
else { TrayTip, Screen Saver Prevention, Disabled, 2, 17 
}
return

;ScreenSaver launch prevention subroutine
preventScreenSaver:
if (global preventScreenSaverVar) {
    MouseMove, 1, 0, 1, R  ;Move the mouse one pixel to the right
    MouseMove, -1, 0, 1, R ;Move the mouse back one pixel
}
return

I’ll put a mirror of this code on my GitHub. If there are any updates code wise you’ll find it there.

Thanks for reading,

jfrmilner


I’ve been using IFTTT for a while now and its really changing the way I use online services. Just recently they added Channels for NewsBlur and Boxcar which allows for some really interesting Recipes, such as if there is a new blog post (NewsBlur) then let you know via a Push notification to your mobile device (Boxcar). This works great for the majority of my feeds but there are some that are just to busy and need to be filtered on certain keywords or RegEx matches before sending me Push notifications, as this is not currently possible (hoping it will one day) I set out to do it myself..

Thankfully NewsBlur provide a simple web based API which can be easily access with PowerShell.

First we must login to the API


$postParams = @{username='jfrmilner';password='new$blur'}
Invoke-WebRequest -Uri 'https://www.newsblur.com/api/login' -Method Post -Body $postParams -SessionVariable newsblur

In the above lines we pass the credentials to the NewsBlur endpoint and store the session in a variable $newsblur.


$stories = @()
foreach ($i in 1..20) {
$postParams = @{page="$i";read_filter="unread"}
$newsContent = Invoke-WebRequest -Uri 'https://www.newsblur.com/reader/feed/4340960' -Method Get -WebSession $newsblur -Body $postParams
$stories += $newsContent.Content | ConvertFrom-Json
}

In the above lines we create an array to store our stories and then collect 20 pages of results from NewsBlur that are unread. The ability to get only unread messages is one of the main reasons I collect the feeds from NewsBlur rather than directly from the sites RSS feed.

The above feed is actually for HotUKDeals. HotUKDeals allow you to customise your own RSS feeds which is nice so for this example I setup one for Gaming deals in the UK – http://www.hotukdeals.com/rss/jfrmilner. You will also notice the feed uses a numeric ID, you can obtain this with a GET /reader/feeds call but for quick ad-hoc use the NewsBlur web portal, click your feed and you will see the number in the address bar, for example:

NewsBlurWebPortalIDLookup


$myWatchList = $stories.stories | ? { $_.story_title -match "Humble|Uncharted 3" }

In the above line I use a simple RegEx to filter for stories that mention Humble or Uncharted 3.

NewsBlurResults1

In the above screenshot we can confirm this is working as expected; now I just need to Push this information to my phone.

Now we will just loop the results to the Send-BoxcarPush function I created my previous post.

foreach ($story in $myWatchList) {
Send-BoxcarPush -notificationTitle $story.story_title -notificationLongMessage $story.story_permalink -notificationSound cash
}

And to the notification sound of cash (the cash I’ll be saving) my phone lights up

NewsBlurResults2

#POST /reader/mark_feed_as_read
$postParams = @{feed_id=4340960}
$newsContent = Invoke-WebRequest -Uri 'https://www.newsblur.com/reader/mark_feed_as_read' -Method POST -WebSession $newsblur -Body $postParams

In the above lines we mark the feed as read to prevent getting duplicate notifications.

#POST /api/logout
#Logout the currently logged in user.
Invoke-WebRequest -Uri 'https://www.newsblur.com/api/logout' -Method POST -WebSession $newsblur

And finally we logout in the above lines.

Now all you need to do is sent this up as a scheduled task in Windows to run as frequently as you need.

As always thank you for reading and if you found this post useful please share and/or leave a comment.

Regards, jfrmilner


Not wanting to add to my already bursting email inbox and finding the need for a more immediate mobile notification of scripted events I find myself looking at https://boxcar.io and their end-user API .

The API provides an example on how to use the service with cURL so as before I will be converting this simple format to use the PowerShell Invoke-WebRequest cmdlet and wrap this into an advanced function.

Setup
•    Download the Boxcar iOS app
•    Get your Access Token and replace the value for the $user_credentials variable in the Param section of the function  – How to get the Token from the client app
•    Like all PowerShell functions you will need to run the code at least once and you can call it as many times as required for the session.

The best way to copy the code from a WordPress blog such as this one is to double click in the below window and then copy, this usually preserves the formatting.

function Send-BoxcarPush  {
<#
.SYNOPSIS
A function to send Boxcar Push messages.
.DESCRIPTION
An example of using PowerShell to send Universal Push Notification messages. Typically the target device is a mobile running iOS (https://boxcar.io/client) or Andriod.
.PARAMETER notificationTitle
Message Title/Subject. 140 Character Maximum.
.PARAMETER notificationLongMessage
Message body text. 1000 Character Maximum.
.PARAMETER notificationSound
Notification Sound played on receiving device. Default is ‘bird-1’, see the Available sounds list for options - https://boxcar.uservoice.com/knowledgebase/articles/306788-how-to-send-your-boxcar-account-a-notification
.PARAMETER hostURI
Default is usually fine.
.PARAMETER user_credentials
Boxcar Access Token. Its recommended you change this value in the Param section of this function else it will need to be specified each time. The access token is available from the general "Settings" screen of Boxcar Client app.
.EXAMPLE
Send-BoxcarPush -notificationTitle "Test Title" -notificationLongMessage "Body message text"
.NOTES
Author: John Milner
Blog  : https://jfrmilner.wordpress.com
File Name: Send-BoxcarPush.ps1
Author: jfrmilner
Email: jfrmilner@googlemail.com
Requires: Powershell v4 (May work on older versions but untested)
Legal: This script is provided "AS IS" with no warranties or guarantees, and confers no rights. You may use, modify, reproduce, and distribute this script file in any way provided that you agree to give the original author credit.
Version: v1.0 - 2014 March 1st - First Version
Version: v1.1 - 2014 March 2nd - Added URL Encoding
.LINK
https://jfrmilner.wordpress.com/2014/03/01/powershell-pus…ered-by-boxcar/
#>
Param(
[String]
[parameter(Mandatory=$true)]
[ValidateLength(1,140)]
$notificationTitle = "test"
,
[String]
[parameter(Mandatory=$true)]
[ValidateLength(1,1000)] #Max is 4kb so 1000 is playing safe.
$notificationLongMessage = "text here"
,
[String]
$notificationSound = 'bird-1'
,
[String]
$hostURI = 'https://new.boxcar.io/api/notifications' #HOST: This is the server to use to send HTTPS API calls.
,
[String]
$user_credentials = 'Put Your Access Token Here' #Access Token. Change this value to your own here or specify here.
)

BEGIN{
Add-Type -AssemblyName System.Web
}#begin
PROCESS{

try
{
$message = Invoke-WebRequest -Uri $hostURI -Method POST -Body "user_credentials=$($user_credentials)&notification[title]=$([System.Web.HttpUtility]::UrlEncode($notificationTitle))&notification[long_message]=$([System.Web.HttpUtility]::UrlEncode($notificationLongMessage))&notification[sound]=$($notificationSound)"
if ($message.StatusCode -eq 201) {
"Message Sent:"
$message.Content | ConvertFrom-Json
}
}

catch [System.Net.WebException]
{
Write-Host  -ForegroundColor Red $_.Exception.Message
switch -regex ($_.Exception.Message)
{
"401" {Write-Host  -ForegroundColor Red "Failure: Check Access Token"}
"404" {Write-Host  -ForegroundColor Red "Failure: No associated device"}
"422" {Write-Host  -ForegroundColor Red "Failure: Unprocessable Entity - All non UTF-8 encoding are rejected"}
default {Write-Host  -ForegroundColor Red $_.Exception.Message}
}

}

finally
{

}
}#process
END{}#end

}

Example

BoxcarPowerShellExample

BoxCariOSExample

Boxcar deliver a great service which is free for 200 pushes per minute and its fast, very fast.
Boxcar notifications can use 20+ different sounds which I’m starting to find quite useful, for example you can have different scripts use different sounds which I just listen out for and this saves me having to look at the phone. I’m also thinking I could use different sounds for different levels of importance.

As always thank you for reading and if you found this post useful please share and/or leave a comment.

Regards, jfrmilner


In this post I’m going to share a script I wrote that speeds up the creation of Cisco MDS 9000 series SAN switch configurations. If like me you’re in the business of adding Cisco UCS Blades in bulk you will know that copying and pasting large amounts of wwpn’s and zoning can be prone to errors – let alone time consuming. Thankfully Cisco released the Cisco PowerTool pack for PowerShell for managing UCS environments; this allows easy access to extract all the necessary information needed to create our configurations quickly and consistently.

The SAN that was used to demo this script contains two Cisco MDS switches with two connections a piece to SPs on an EMC VNX5300.

This script should be treated as an example rather than a script that is generic enough to be run in any environment. In the below script you will notice three areas that have “#User to change as needed” comments, here you will see that I have unique values specific to my environment that will need to be edited. These values include my VSAN numbering, Zoneset naming and some datacentre location information.

First you will need to import the PowerShell UCS module and then connect to your UCS environment:

Import-Module CiscoUCSPS
Connect-Ucs <UCSIP> -Credential (Get-Credential)

Upon running the script you will be prompted for the serviceProfilePrefix which I use to filter Service Profile Names, in my example I will use the text “PDC” which represents a collection of VMware vCloud Director Provider vDC Blades.

Note: To copy the code please double click within the code box.

<#
.NOTES
Author: John Milner aka jfrmilner
Blog  : https://jfrmilner.wordpress.com
Post  : http://wp.me/pFqJZ-6y
Requires: Powershell + Cisco UCS PowerTool Pack
Legal: This script is provided "AS IS" with no warranties or guarantees, and confers no rights. You may use, modify, reproduce, and distribute this script file in any way provided that you agree to give the original author credit.
Version: v1.0 - 27 Oct 2013
#>
param ( [Parameter(Mandatory=$true)] [System.String]$serviceProfilePrefix )

$vSANs = 3801, 3802 #User to change as needed

#Clear Host Screen
Clear-Host

#Collect all Initiators
$initiators =  Get-UcsWwnInitiator | ? { $_.Assigned -eq "yes" } | Sort-Object -Property AssignedToDn
foreach ( $initiator in $initiators ) {
$split = $initiator.AssignedToDn -split "/"
Add-Member -InputObject $initiator -Name ServiceProfile -MemberType NoteProperty -Value ($Split[1] -replace "^ls-") -Force
Add-Member -InputObject $initiator -Name vHBA -MemberType NoteProperty -Value "vHBA$($split[2].ToCharArray()[-1])" -Force
}

#Create Service Profile List
$serviceProfiles = $initiators | Sort-Object serviceprofile | Select-Object serviceprofile -Unique
#Filter List with serviceProfilePrefix param
$serviceProfiles = $serviceProfiles | ? { $_.serviceProfile -match $serviceProfilePrefix } | % { $_.serviceprofile }

$vHBAs = "vHBA0","vHBA1"

foreach ( $vSAN in $vSANs ) {

switch ($vSAN) {
3801 {"!D10 Config" ; $vHBANum = $vHBAs[0] ; $zoneSetName = "D11_MDS01" ; $SPA = "SPA0" ; $SPB = "SPB1" ; [int]$dataHall = 1 } #User to change as needed
3802 {"!H18 Config" ; $vHBANum = $vHBAs[1] ; $zoneSetName = "H18_MDS02" ; $SPA = "SPA1" ; $SPB = "SPB0" ; [int]$dataHall = 2 } #User to change as needed
}
foreach ( $serviceProfile in $serviceProfiles ) {
$vHBA = $initiators | ? { ($_.serviceProfile -eq $serviceProfile) -and ($_.vHBA -eq $vHBANum)}

"fcalias name ESX_DH$($dataHall)_$($serviceProfile)_$($vHBA.vHBA) vsan $($vSAN)"
"member pwwn $(($vHBA.Rn).tolower())"
}
foreach ( $serviceProfile in $serviceProfiles ) {
"zone name Z_ESX_DH$($dataHall)_$($serviceProfile)_$($vHBANum)_DH$($dataHall)_VNX5300 vsan $($vSAN)"
"member fcalias DH$($dataHall)_VNX5300_$($SPA)"
"member fcalias DH$($dataHall)_VNX5300_$($SPB)"
"member fcalias ESX_DH$($dataHall)_$($name)_$($vHBANum)"
}
"zoneset name ZS_NDC1_$($zoneSetName)_SAN_JFRMILNER_NET vsan $($vSAN)"
foreach ( $serviceProfile in $serviceProfiles ) {
"member Z_ESX_DH$($dataHall)_$($serviceProfile)_$($vHBANum)_DH$($dataHall)_VNX5300"
}

}

The output of the script will be presented to the console, here is an example:

MDS Config

As you can see in the above output the script has created fcaliases for each of the newly provisioned PDC Service Profile HBAs, created Zones and added these to the Zoneset for both my Switches.

Additionally this script can be easily modified to do bulk removals as it’s just a matter of prefixing some of the configuration lines with “no” for example “no fcalias name” and “no zone name”, as this has potential of causing an APD situation I will not be providing any example of this.

I hope you find this script useful and that it saves you as much time and reduces human error incidents as it has for me. As always please add a comments below and thank you for reading.

Regards,

jfrmilner


Today I found myself in a situation where I needed to enter a product key and then activate several Windows 2008 R2 Servers, this would be a real chore if I had to use the GUI.

A quick internet search brought me to slmgr.vbs a great little script that has been included with Windows since Vista/2008 and it even works remotely. Looking at the options on the TechNet page you can see that a simple “slmgr.vbs ServerName -ipk “AAAAA-BBBBB-CCCCC-DDDDD-EEEEE””(Replace the latter with a valid product key) would sort the product key task out for me. To activate and complete the task I would need to use with the following command “slmgr.vbs ServerName –ato”, simple.

One of the tricks I find myself doing again and again from the PowerShell prompt is simple string manipulation, for example:

Get-VM LAB* | % { write "slmgr.vbs $($_.Name) -ipk `" AAAAA-BBBBB-CCCCC-DDDDD-EEEEE `" }

Would create something along the lines of:

slmgr.vbs LAB1-SQL-001 -ipk “AAAAA-BBBBB-CCCCC-DDDDD-EEEEE”
slmgr.vbs LAB1-DC-001 -ipk “AAAAA-BBBBB-CCCCC-DDDDD-EEEEE”
slmgr.vbs LAB1-EX-001 -ipk “AAAAA-BBBBB-CCCCC-DDDDD-EEEEE”

To save yourself even more time you can send the output of the above command directly to the clipboard by piping to “clip”, for example:

Get-VM LAB* | % { write "slmgr.vbs $($_.Name) -ipk `" AAAAA-BBBBB-CCCCC-DDDDD-EEEEE `" } | clip

This allows you to paste back into the console and execute your commands.

After each command executes you are presented with a pop up window like the one below

Activate-01

Now do the same for your activation command

Get-VM LAB* | % { write "slmgr.vbs $($_.Name) -ato" }  | clip

After each command executes you are again presented with another pop up window, this one will look like the one below

Activate-02

Admittedly this is a little quick and dirty and could do with some error checking but it got the job done and saved me a couple of hours work, hopefully it will save others time as well.

Thanks for reading.

jfrmilner


This month I managed to get my hands on an Opengear IP-PDU 9108 8 Port Switched & Metered PDU http://www.opengear.com/product-ip-pdu.html which seems to be a rebranded http://www.digipower.com.tw/PDU/BravoPDUswitched.htm. The PDU can be controlled over the network using a web interface or SNMP.

IPPDU-04

Digipower have an online demo available on the following link http://www.digipower.com.tw/PDU/BravoPDUswitched.htm, at the time of writing this post the address was http://211.75.143.21:8080 (snmp:1234). I’ll demo my code against this test system and if you want to test the code is a safe environment this could be useful for you.

Why bother if you have web and SNMP access?

Well I wanted to do this with native PowerShell cmdlets so that ruled out SNMP and to be quite honest the web portal is great for setting up the main configuration but a bit too long winded to turn a single socket on and off, or get a quick outlet status report. I also wanted to do this with web requests to that I could later use the same techniques learned for this post with an Arduino project I have on my to-do list.

Investigating the cgi and scripts running on the PDU

The PDU’s default configuration is to have the hostname  set to “digiboard” so assuming DHCP is running on your network after a few seconds you’ll be able to connect to the web portal with http://digiboard. I navigated to the Control > Outlet (http://digiboard/outlet.htm) page and selected View Source, near the bottom of the code I noticed a mention of the status.xml:


newAJAXCommand('status.xml'

Let’s starts with the Status.XML, in my browser I loaded up http://digiboard/status.xml and the response was:


<?xml version="1.0"?>

<a href="http://digiboard/status.xml"><response></a><pot0>,,0.4,0.0,0.0,0.0,0.0,0.0,0.0,0.0,1,1,0,0,0,1,1,0,1,1,1,1,1,1,1,1,1,1,1,1,1,1,1,1,0,5,5,5,5,5,5,5,0.4,0,</pot0><outn>,,,,,,,,</outn></response>

Jackpot, now I needed to find where in that long response the actual statuses of each of the outlets were. I thought the best to make them stand out was to set them alternate e.g.

1,0,1,0,1,0,1,0 first

Result : ,,0.2,0.0,0.0,0.0,0.0,0.0,0.0,0.0,1,0,1,0,1,0,1,0,1,1,1,1,1,1,1,1,1,1,1,1,1,1,1,1,0,5,5,5,5,5,5,5,0.2,0,

and then 0,1,0,1,0,1,0,1.

Result: ,,0.2,0.0,0.0,0.0,0.0,0.0,0.0,0.0,0,1,0,1,0,1,0,1,1,1,1,1,1,1,1,1,1,1,1,1,1,1,1,1,0,5,5,5,5,5,5,5,0.2,0,

This pattern was easy to spot and just to make things as clear as possible for this post I’ve bolded and underlined the areas of interest.

To read this with PowerShell I used the Invoke-WebRequest cmdlet but first I created a variable to hold the credentials to access the web portal (this is just to prevent entering the credentials on each request):

$cred = Get-Credential #Defaults are snmp:1234
$statusXML = Invoke-WebRequest -Uri http://digiboard/status.xml -Credential $cred

Collect the Sub String that we’re interested in:

$statusXML.Content.Substring(52,15)

0,1,0,1,0,1,0,1

That wraps up the Status.xml, now onto turning the outlets on and off.

Also on the http://digiboard/outlet.htm  source code I noticed two functions of interest:

function GetGroupOn()
{
var s = '';
var i = 1;
//for(var i = 1; i < 3; i++)
for(var j = 1; j < 9; j++)
{
if( document.getElementById('C'+ i + j).checked )
s += 1;
else
s += 0;
}
s += "00000000" + "00000000";
if(confirm("turn on the outlet"))
newAJAXCommand('ons.cgi?led='+s, null, false);
}

function GetGroupOff()
{
var s = '';
var i = 1;
//for(var i = 1; i < 3; i++)
for(var j = 1; j < 9; j++)
{
if( document.getElementById('C'+ i + j).checked )
s += 1;
else
s += 0;
}
s += "00000000" + "00000000";
if(confirm("turn off the outlet"))
newAJAXCommand('offs.cgi?led='+s, null, false);
}

You can see from these two functions that either ons.cgi? or off.cgi? is called with two blocks of eight numbers, with a bit of luck I tried:

Invoke-WebRequest http://digiboard/offs.cgi?led=000000010000000000000000 -Credential $cred

Sure enough outlet 8 (H) turned off, let’s try and turn this back on:

Invoke-WebRequest http://digiboard/ons.cgi?led=000000010000000000000000 -Credential $cred

Yep, that worked!

I would guess that the second block of 8 numbers is for 16 outlet PDU’s but I cannot be sure.

Creating the Get-IPPDU function

Using what I discovered I wrote the following function to collect and format the current status of the outlets:

function Get-IPPDU {
<#
.NOTES
Author: John Milner aka jfrmilner
Blog  : https://jfrmilner.wordpress.com
Post  : http://wp.me/pFqJZ-5l
Requires: Powershell V3
Legal: This script is provided "AS IS" with no warranties or guarantees, and confers no rights. You may use, modify, reproduce, and distribute this script file in any way provided that you agree to give the original author credit.
Version: v1.0 - 06 Jan 2013
#>
param(
[System.Management.Automation.PSCredential]$Credential,
$URI = "http://digiboard"
)
try {
$statusXML = Invoke-WebRequest -Uri ($URI + "/status.xml") -Credential $Credential
}
catch {
$_.Exception.Message
break
}
$statusXMLArray = $statusXML.Content.Substring(52,15)
#Status Report
$outlet = 65
$statusReport = @()
foreach ($status in ($statusXMLArray -split ",") ) {
$statusReport += @{$("Outlet" + [char]$outlet)=$status}
$outlet++
}
$statusReport
}

This provides a couple of parameters, URI and Credentials, both are self-explanatory. Here is a screenshot of me trying this against the one on my LAN and the one from the demo site mentioned earlier.

IPPDU-01

Creating the Set-IPPDU function

Using what I discovered I wrote the following function to change the power states of outlets:

function Set-IPPDU {
<#
.NOTES
Author: John Milner aka jfrmilner
Blog  : https://jfrmilner.wordpress.com
Post  : http://wp.me/pFqJZ-5l
Requires: Powershell V3
Legal: This script is provided "AS IS" with no warranties or guarantees, and confers no rights. You may use, modify, reproduce, and distribute this script file in any way provided that you agree to give the original author credit.
Version: v1.0 - 06 Jan 2013
#>
param(
[Parameter(Mandatory=$true)]
[ValidatePattern("[A-H]{1,8}")]
[array]$Outlets,
[ValidateSet("On","Off")] $PowerState,
$URI = "http://digiboard",
[System.Management.Automation.PSCredential]$Credential
)
$outletKeys = [PSCustomObject][Ordered]@{A=0;B=1;C=2;D=3;E=4;F=5;G=6;H=7}
$statusKeys = [PSCustomObject][Ordered]@{ON=1;OFF=0}

$charArray = ("00000000").ToCharArray()
foreach ($request in $outlets ) {
$charArray[($outletKeys.($request))] = "1"
"Turn {0} {1}" -f $request, $powerState
}
$stateString  = -join $charArray
$URI = ($URI + "/" + $powerState.ToLower() + "s.cgi?led=" + $stateString  + "0000000000000000")
Invoke-WebRequest $URI -Credential $Credential | Out-Null
}

We have both the URI and Credentials parameters like the Get-IPPDU function, I also added “Outlets” which accepts the letter name of the Outlet or a comma separated collection of outlet letters and finally the PowerState which accepts On or Off. Here is a screenshot of me testing the functions against the IP PDU on my LAN.

IPPDU-02

I think this is another great example of the power of the new PowerShell 3 Invoke-WebRequest cmdlet and an interesting way to get PowerShell interacting with system/hardware it was never intended for.

These functions should work with any of the digipower PDU’s, such as the Amazing PDU and Bravo PDU. Thanks for reading and as always your comments are welcome.

Regards,

jfrmilner


First Post 1 of 3

Previous Post 2 of 3

So to summarize we have collected all the RF codes for my Energenie Power Strip, created a Sketch on an Arduino connected to a an RF transmitter the only thing left it to use PowerShell to send Serial commands.

Now for the PowerShell code:

function Send-ArduinoSerial {
param ( [parameter(Mandatory=$true, ValueFromPipeline=$true)] [int[]] $byte )
#Find Arduino COM Port
$PortName = (Get-WmiObject Win32_SerialPort | Where-Object { $_.Name -match "Arduino"}).DeviceID
if ( $PortName -eq $null ) { throw "Arduino Not Found"}
#Create SerialPort and Configure
$port = New-Object System.IO.Ports.SerialPort
$port.PortName = $PortName
$port.BaudRate = "9600"
$port.Parity = "None"
$port.DataBits = 8
$port.StopBits = 1
$port.ReadTimeout = 2000 #Milliseconds
$port.open() #open serial connection
Start-Sleep -Milliseconds 100 #wait 0.1 seconds
$port.Write($byte) #write $byte parameter content to the serial connection
try    {
#Check for response
if (($response = $port.ReadLine()) -gt 0)
{ $response }
}
catch [TimeoutException] {
"Time Out"
}
finally    {
$port.Close() #close serial connection
}
}

Once the function has been loaded into your PowerShell console we can turn on and off each of the sockets, for example

Energenie-PSFunctionExample

This is one of those moments when an image fails to express the sheer excitement of a lamp going on and off!

If you forget to plug in your Arduino an exception will be thrown for example

Energenie-PSFunctionExampleError

What’s Next/Further thoughts

  • Program some keyboard shortcuts to power the sockets on and off.
  • Create a web front end and on that note I should point out that Energenie have another solution the LAN Power Management System available, this would be an easier solution for the none techie folks.
  • Try this with a Raspberry Pi

Anyways, thanks for reading my posts and I hope you enjoyed Powering Power Sockets with PowerShell as much as I did!

Regards,

jfrmilner